안드로이드에서 findViewById 완벽 가이드: 사용법, 동적 뷰 조작, 문제점과 해결 방법
아래와 같은 목차대로 진행해보고자 한다.
목차
findViewById개요findViewById기본 사용법: MainActivity에서 뷰에 접근하기- 동적 뷰 삽입 및 삭제 실습
- Layout Inspector로 뷰 트리 확인하기
findViewById의 문제점과 해결 방안- XML의 ID 일치 문제
- Null 안전성 문제
- Null 안전성 문제 및 실습
- NullPointerException 확인 실습
- Null 안전성을 위한 세이프 콜 연산자 사용
- 명시적인 Null 체크를 통한 문제 해결
- findViewById 의 런타임 뷰 트리 탐색 문제
- ClassCastException 발생 문제
1. findViewById 개요
안드로이드 개발에서 findViewById는 XML 레이아웃에 정의된 뷰를 코드에서 참조하기 위해 사용하는 메서드이다. 여기에서는 findViewById의 기본 사용법을 설명하고, 동적 뷰 삽입과 삭제, ID 변경 시 런타임 에러를 다뤄보겠다.
2. findViewById 기본 사용법: MainActivity에서 뷰에 접근하기
먼저, activity_main.xml과 MainActivity를 사용해 findViewById로 뷰에 접근하고 텍스트 변경 기능을 구현해본다.
이 예제에서는 버튼 클릭 시 TextView의 텍스트가 변경된다. findViewById를 통해 TextView와 Button에 접근하는 방법을 보여준다.
activity_main.xml
<?xml version="1.0" encoding="utf-8"?>
<androidx.constraintlayout.widget.ConstraintLayout xmlns:android="http://schemas.android.com/apk/res/android"
    xmlns:app="http://schemas.android.com/apk/res-auto"
    xmlns:tools="http://schemas.android.com/tools"
    android:id="@+id/main"
    android:layout_width="match_parent"
    android:layout_height="match_parent"
    tools:context=".MainActivity">

    <TextView
        android:id="@+id/textView"
        android:layout_width="wrap_content"
        android:layout_height="wrap_content"
        android:text="Hello World!"
        android:textSize="18sp"
        app:layout_constraintBottom_toTopOf="@+id/button"
        app:layout_constraintEnd_toEndOf="parent"
        app:layout_constraintStart_toStartOf="parent"
        app:layout_constraintTop_toTopOf="parent" />

    <Button
        android:id="@+id/button"
        android:layout_width="wrap_content"
        android:layout_height="wrap_content"
        android:text="Change Text"
        app:layout_constraintBottom_toBottomOf="parent"
        app:layout_constraintEnd_toEndOf="parent"
        app:layout_constraintStart_toStartOf="parent"
        app:layout_constraintTop_toBottomOf="@id/textView" />

</androidx.constraintlayout.widget.ConstraintLayout>
MainActivity.kt
package com.yujin45.androidstudy

class MainActivity : AppCompatActivity() {
    override fun onCreate(savedInstanceState: Bundle?) {
        super.onCreate(savedInstanceState)
        enableEdgeToEdge()
        setContentView(R.layout.activity_main)
        ViewCompat.setOnApplyWindowInsetsListener(findViewById(R.id.main)) { v, insets ->
            val systemBars = insets.getInsets(WindowInsetsCompat.Type.systemBars())
            v.setPadding(systemBars.left, systemBars.top, systemBars.right, systemBars.bottom)
            insets
        }

        val textView = findViewById<TextView>(R.id.textView)
        val button = findViewById<Button>(R.id.button)

        textView.text = "Welcome to Android!"

        button.setOnClickListener {
            textView.text = "Button Clicked!"
        }
    }
}
3. 동적 뷰 삽입 및 삭제 실습
ConstraintLayout에서 버튼 클릭 시 동적으로 새로운 TextView를 추가하고, 이후 삭제하는 코드를 작성해보자.
동적으로 뷰 추가하기
- 버튼을 클릭하면 새로운
TextView를 추가하도록 한다.ConstraintLayout의 경우 추가된 뷰에도 제약 조건을 설정해야 한다.
button.setOnClickListener {
    // 새로운 TextView 생성
    val newTextView = TextView(this).apply {
        id = View.generateViewId()
        text = "New Dynamic TextView"
        textSize = 16f
    }

    // ConstraintLayout에 추가
    val constraintLayout = findViewById<ConstraintLayout>(R.id.main)
    constraintLayout.addView(newTextView)

    // 제약 조건 설정
    val constraintSet = ConstraintSet()
    constraintSet.clone(constraintLayout)
    constraintSet.connect(newTextView.id, ConstraintSet.TOP, textView.id, ConstraintSet.BOTTOM, 16)
    constraintSet.connect(newTextView.id, ConstraintSet.START, ConstraintSet.PARENT_ID, ConstraintSet.START)
    constraintSet.connect(newTextView.id, ConstraintSet.END, ConstraintSet.PARENT_ID, ConstraintSet.END)
    constraintSet.applyTo(constraintLayout)
}
동적으로 뷰 삭제하기
TextView가 추가된 이후 다시 버튼을 클릭했을 때 이를 삭제하는 로직을 추가해보자.
button.setOnClickListener {
    val constraintLayout = findViewById<ConstraintLayout>(R.id.main)
    val dynamicTextView = constraintLayout.findViewById<TextView>(newTextView.id)

    // TextView가 존재할 경우 삭제
    dynamicTextView?.let {
        constraintLayout.removeView(it)
    }
}
전체 코드
- 위의 과정을 버튼을 클릭할 때마다 확인해주기 위하여 아래와 같이 수정했다.
package com.yujin45.androidstudy

class MainActivity : AppCompatActivity() {
    private var isTextViewAdded = false  // 추가된 TextView 여부 확인을 위한 변수
    private var newTextViewId: Int = View.generateViewId()  // 동적으로 추가할 TextView의 ID

    override fun onCreate(savedInstanceState: Bundle?) {
        super.onCreate(savedInstanceState)
        enableEdgeToEdge()
        setContentView(R.layout.activity_main)

        // System bar padding 설정
        ViewCompat.setOnApplyWindowInsetsListener(findViewById(R.id.main)) { v, insets ->
            val systemBars = insets.getInsets(WindowInsetsCompat.Type.systemBars())
            v.setPadding(systemBars.left, systemBars.top, systemBars.right, systemBars.bottom)
            insets
        }

        val textView = findViewById<TextView>(R.id.textView)
        val button = findViewById<Button>(R.id.button)
        val constraintLayout = findViewById<ConstraintLayout>(R.id.main)

        textView.text = "Welcome to Android!"

        button.setOnClickListener {
            if (!isTextViewAdded) {
                // 새로운 TextView 생성
                val newTextView = TextView(this).apply {
                    id = newTextViewId
                    text = "New Dynamic TextView"
                    textSize = 16f
                }

                // ConstraintLayout에 추가
                constraintLayout.addView(newTextView)

                // 제약 조건 설정
                val constraintSet = ConstraintSet()
                constraintSet.clone(constraintLayout)
                constraintSet.connect(newTextView.id, ConstraintSet.TOP, textView.id, ConstraintSet.BOTTOM, 16)
                constraintSet.connect(newTextView.id, ConstraintSet.START, ConstraintSet.PARENT_ID, ConstraintSet.START)
                constraintSet.connect(newTextView.id, ConstraintSet.END, ConstraintSet.PARENT_ID, ConstraintSet.END)
                constraintSet.applyTo(constraintLayout)

                isTextViewAdded = true
                button.text = "Remove TextView"
            } else {
                // 동적으로 추가된 TextView 삭제
                val dynamicTextView = constraintLayout.findViewById<TextView>(newTextViewId)
                dynamicTextView?.let {
                    constraintLayout.removeView(it)
                }

                isTextViewAdded = false
                button.text = "Add TextView"
            }
        }
    }
}
4. Layout Inspector로 뷰 트리 확인하기
- 앱 실행 및 Layout Inspector 열기
- 앱을 실행하고 Android Studio에서 Layout Inspector를 연다.

- 뷰 추가 및 삭제 후 트리 변화 확인
- 버튼 클릭 시
TextView가 추가되거나 삭제될 때, Layout Inspector에서 뷰 트리가 어떻게 변화하는지 실시간으로 관찰할 수 있다. 
- 버튼 클릭 시
- 이때 주의사항!!
Layout Inspector에서 위처럼 Filter system-defined layers 옵션이 체크되어 있으면, 시스템에서 동적으로 생성된 레이어나 뷰가 화면에 표시되지 않는다.- 동적으로 생성된 뷰를 확인하려면 Filter system-defined layers 옵션을 해제해야 한다.

- 이렇게 하면 버튼 클릭으로 동적으로 추가된
TextView가Layout Inspector에 표시되어 뷰 트리의 변화를 실시간으로 확인할 수 있다.

5. findViewById의 문제점과 해결 방안
안드로이드 개발에서 findViewById를 사용할 때 다음과 같은 문제점이 발생할 수 있다.
1. XML의 ID와 코드 간 ID 일치 문제 : Unresolved reference
findViewById는 XML에서 설정한 ID를 기반으로 뷰를 찾는다. 코드에서 참조하려는 ID가 XML에 정의되지 않거나 잘못된 ID를 사용하면 컴파일 타임 오류가 발생한다. 예를 들어, MainActivity에서 findViewById(R.id.textView)를 사용하려고 할 때, XML에 textView가 아닌 다른 ID로 정의되어 있으면 빌드 과정에서 "Unresolved reference: textView"와 같은 오류가 발생하여 코드가 실행되지 않는다.

Unresolved reference: textView 오류는 코드에서 참조하려는 ID가 XML에 존재하지 않을 때 발생하는 컴파일 타임 에러다. 즉, 코드에서 findViewById(R.id.textView)로 textView를 찾으려 하지만, XML에서 해당 ID가 정의되지 않아서 빌드 자체가 실패하는 것이다.
이 오류는 ID가 변경되거나 잘못된 ID를 사용할 때 발생할 수 있으며, findViewById 사용 시 코드와 XML 간의 ID 일치가 필수적이라는 단점을 보여준다. 즉, 다음과 같은 불편함이 발생할 수 있다:
- ID 불일치로 인한 컴파일 타임 오류:
- XML과 코드 간 ID가 불일치하면
Unresolved reference에러가 발생하여 빌드가 되지 않으므로, 반드시 코드에서 XML에 정의된 정확한 ID를 사용해야 한다.
- XML과 코드 간 ID가 불일치하면
- ID 변경 시 코드 수정 필요:
- XML에서 ID를 변경하면, 해당 ID를 참조하는 모든 코드에서 이를 동일하게 수정해야 한다. 이는 코드 유지보수에 어려움을 줄 수 있다.
이 문제는 코드와 XML 파일 간의 ID 일치가 필요하다는 점에서 코드 유지보수를 어렵게 만들 수 있다
2. Null 안전성 문제
findViewById로 뷰를 찾을 때, 해당 ID가 없거나 뷰가 삭제된 상태에서 접근을 시도하면 NullPointerException이 발생할 수 있다. Kotlin에서는 null 안전성을 강화하기 위해 세이프 콜 연산자(?.)를 사용하여 null을 체크할 수 있다. 예를 들어 findViewById<TextView>(R.id.textView)?.text = "Hello"와 같이 안전하게 사용할 수 있다.
Java에서는 Kotlin과 달리 이러한 null 안전성을 기본적으로 제공하지 않는다. Java에서 findViewById로 반환된 객체가 null일 경우 이를 처리하지 않고 사용할 경우 런타임에서 NullPointerException이 발생할 수 있다. Java에서 이 문제를 방지하려면 다음과 같은 null 체크를 수동으로 추가해야 한다.
TextView textView = findViewById(R.id.textView);
if (textView != null) {
    textView.setText("Hello");
} else {
    // null인 경우 처리
}
이렇게 수동으로 null을 체크하여야 하며, 이를 잊을 경우 코드의 안정성이 떨어질 수 있다. 이를 보완하기 위해, Android에서는 ViewBinding이나 DataBinding을 사용해 null 안전성을 높이고, XML과 코드 간 ID 일치 문제를 해결할 수 있는 방법을 제공한다.
3. Null 안전성 문제 관련 실습: Kotlin에서 동적 뷰 삭제 후 접근 시 NullPointerException 확인
findViewById를 사용할 때, 동적으로 뷰를 삭제한 후 해당 뷰에 접근하면 NullPointerException이 발생할 수 있다. Kotlin에서는 이 상황을 세이프 콜 연산자(?.) 또는 명시적인 Null 체크로 해결할 수 있다. 이 실습에서는 동적으로 뷰를 삭제한 후 접근할 때 발생하는 NullPointerException을 확인하고, Kotlin의 null 안전성을 활용하여 해결하는 방법을 실습해보겠다.
실습: 동적 뷰 삭제 후 NullPointerException 발생 및 해결
- 기본 코드 준비
- NullPointerException을 유도하려면,
findViewById를 통해 뷰를 다시 찾도록 하거나 뷰를 완전히 null로 설정해야 한다. - 뷰를 삭제한 후
findViewById로 해당 뷰에 다시 접근하는 방식으로 NullPointerException을 유도해보자.
- NullPointerException을 유도하려면,
- activity_main.xml 예시
<?xml version="1.0" encoding="utf-8"?>
<androidx.constraintlayout.widget.ConstraintLayout xmlns:android="<http://schemas.android.com/apk/res/android>"
    xmlns:app="<http://schemas.android.com/apk/res-auto>"
    xmlns:tools="<http://schemas.android.com/tools>"
    android:id="@+id/main"
    android:layout_width="match_parent"
    android:layout_height="match_parent"
    tools:context=".MainActivity">

    <TextView
        android:id="@+id/textView"
        android:layout_width="wrap_content"
        android:layout_height="wrap_content"
        android:text="Hello World!"
        android:textSize="18sp"
        app:layout_constraintBottom_toTopOf="@+id/button"
        app:layout_constraintEnd_toEndOf="parent"
        app:layout_constraintStart_toStartOf="parent"
        app:layout_constraintTop_toTopOf="parent" />

    <Button
        android:id="@+id/button"
        android:layout_width="wrap_content"
        android:layout_height="wrap_content"
        android:text="Toggle TextView"
        app:layout_constraintBottom_toBottomOf="parent"
        app:layout_constraintEnd_toEndOf="parent"
        app:layout_constraintStart_toStartOf="parent"
        app:layout_constraintTop_toBottomOf="@id/textView" />
</androidx.constraintlayout.widget.ConstraintLayout>
3. MainActivity.kt 예시
package com.yujin45.androidstudy

import android.os.Bundle
import android.widget.Button
import android.widget.TextView
import androidx.appcompat.app.AppCompatActivity
import androidx.constraintlayout.widget.ConstraintLayout

class MainActivity : AppCompatActivity() {
    private var isTextViewAdded = true  // TextView의 존재 여부를 확인하기 위한 변수

    override fun onCreate(savedInstanceState: Bundle?) {
        super.onCreate(savedInstanceState)
        setContentView(R.layout.activity_main)

        val button = findViewById<Button>(R.id.button)
        val constraintLayout = findViewById<ConstraintLayout>(R.id.main)

        button.setOnClickListener {
            if (isTextViewAdded) {
                // TextView 삭제
                val textView = findViewById<TextView>(R.id.textView)
                constraintLayout.removeView(textView)
                isTextViewAdded = false
                button.text = "Access Deleted TextView"
            } else {
                // 삭제된 TextView에 다시 접근 시도 -> NullPointerException 유도
                val textView = findViewById<TextView>(R.id.textView) // 삭제 후 다시 접근 시 null 반환
                textView.text = "Trying to access deleted TextView" // 여기서 NullPointerException 발생
            }
        }
    }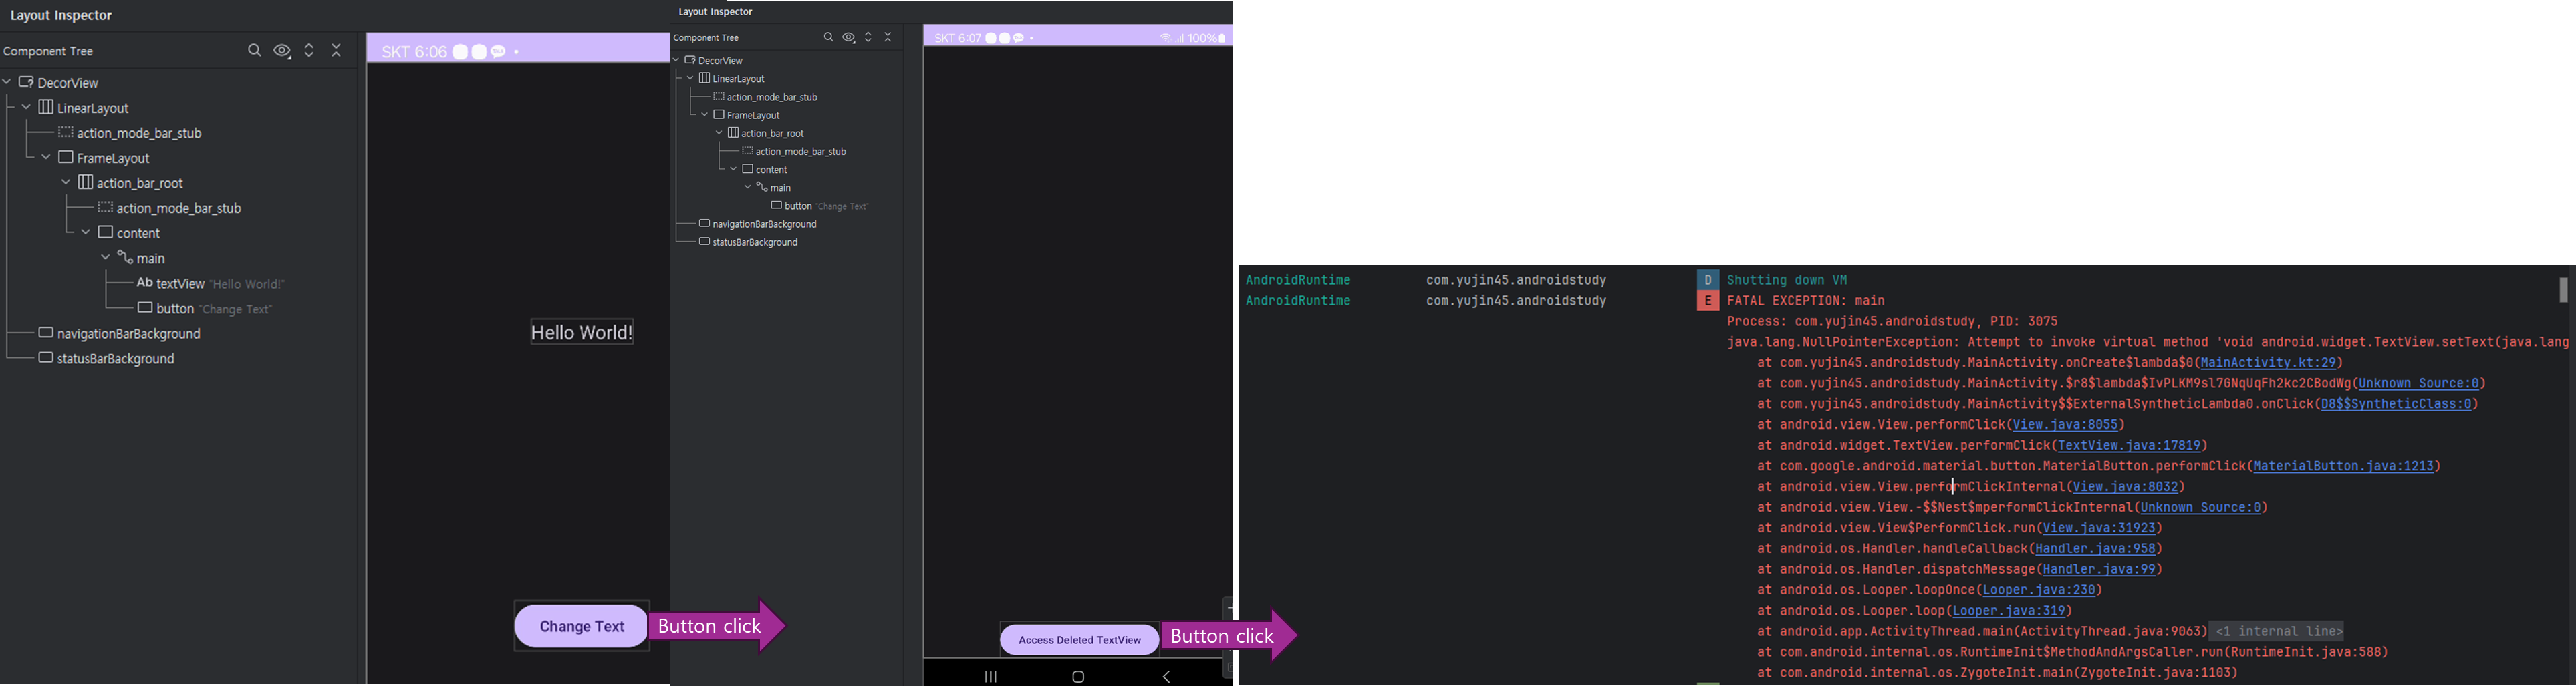
}- 첫 번째 버튼 클릭 시
TextView를 삭제한다. - 두 번째 버튼 클릭 시
findViewById(R.id.textView)를 호출하여 삭제된 뷰에 다시 접근한다. 이때findViewById는null을 반환하므로textView.text에서 NullPointerException이 발생하게 된다.
4. Kotlin의 Null 안전성 사용하여 문제 해결이렇게 하면 NullPointerException을 방지할 수 있다.
- Kotlin에서는 세이프 콜 연산자(?.)를 사용해 null 안전성을 확보할 수 있다. textView가 null일 경우 .text에 접근하지 않도록 아래와 같이 수정한다.
- 이렇게 하면 NullPointerException을 방지할 수 있다.
button.setOnClickListener {
            if (isTextViewAdded) {
                // TextView 삭제
                val textView = findViewById<TextView>(R.id.textView)
                constraintLayout.removeView(textView)
                isTextViewAdded = false
                button.text = "Access Deleted TextView"
            } else {
                // 삭제된 TextView에 다시 접근 시도 -> NullPointerException 유도
                val textView = findViewById<TextView>(R.id.textView) // 삭제 후 다시 접근 시 null 반환
                textView?.text = "Trying to access deleted TextView" // 세이프 콜을 사용하여 NullPointerException 방지
            }
        }
5. 명시적인 Null 체크로 문제 해결
- 세이프 콜 대신 명시적으로 null을 체크하여 에러를 방지할 수도 있다.
 button.setOnClickListener {
             if (isTextViewAdded) {
                 val textView = findViewById<TextView>(R.id.textView)
                 constraintLayout.removeView(textView)
                 isTextViewAdded = false
                 button.text = "Access Deleted TextView"
             } else {
                 val textView = findViewById<TextView>(R.id.textView)
                 // 명시적 null 체크
                 if (textView != null) {
                     textView.text = "Trying to access deleted TextView"
                 } else {
                     println("TextView is null and cannot be accessed")
                 }
             }
         }
이 실습을 통해 findViewById로 가져온 뷰가 삭제된 경우 발생할 수 있는 NullPointerException을 이해하고, Kotlin에서 제공하는 null 안전성 기능을 활용하여 안전하게 접근하는 방법을 실습할 수 있다. Java에서는 명시적인 null 체크가 필요하다는 점도 함께 고려해 보자.
4. findViewById의 런타임 뷰 트리 탐색 문제
안드로이드에서 findViewById는 뷰 트리를 런타임에 탐색하여 특정 ID와 일치하는 뷰를 찾는다. 앞서 동적으로 뷰를 생성하고 삭제하며 Layout Inspector를 통해 뷰 트리의 변화를 확인해보았듯이, findViewById는 이처럼 전체 뷰 트리를 순회하여 원하는 뷰를 찾기 때문에 복잡한 레이아웃에서는 성능에 영향을 미칠 수 있다.
findViewById의 동작 방식
findViewById의 실제 동작 방식을 이해하기 위해 AppCompatActivity와 View 클래스의 코드를 살펴보면, 이 메서드가 어떻게 뷰를 찾는지 확인할 수 있다.
// AppCompatActivity.java
@Override
public <T extends View> T findViewById(@IdRes int id) {
    return getDelegate().findViewById(id);
}
AppCompatActivity의 findViewById 메서드는 내부적으로 Delegate 객체를 통해 뷰를 검색하는 구조다. 이 Delegate는 주어진 ID를 가진 뷰를 찾기 위해 뷰 트리를 순회한다.
// View.java
@Nullable
public final <T extends View> T findViewById(@IdRes int id) {
    if (id == NO_ID) {
        return null;
    }
    return findViewTraversal(id);
}

protected <T extends View> T findViewTraversal(@IdRes int id) {
    if (id == mID) {
        return (T) this;
    }
    return null;
}
View 클래스의 findViewTraversal 메서드는 뷰 트리에서 ID와 일치하는 뷰를 순회하며 찾는 구조로, 주어진 ID와 뷰의 ID를 비교하여 일치할 경우 해당 뷰를 반환한다. 이처럼 findViewById는 뷰 트리 내에서 일치하는 ID가 나타날 때까지 순회하며, 뷰 트리가 복잡해질수록 탐색 시간도 길어진다.
추가로 ViewGroup 내에서의 탐색 등에 관한 내용은 아래를 참고하자.
https://yujinius45.tistory.com/125
[Android] findViewById 동작 원리 파해치기
안드로이드 findViewById 동작 원리 파해치기https://velog.io/@ows3090/Android-findViewById-원리 [Android] findViewById 원리findViewById란? 안드로이드 개발에서 findViewById 메소드는 레이아웃에 있는 뷰를 리소스 id를
yujinius45.tistory.com
탐색 비용 문제와 해결 방안
findViewById 방식은 다음과 같은 문제를 초래할 수 있다:
- 런타임 성능 저하: 복잡한 레이아웃에서 뷰 트리를 순회하는 비용이 커지며, 앱의 실행 속도가 저하될 수 있다.
- 유지보수성 저하: 코드와 XML 간의 ID 일치가 필수적이므로, ID 변경 시 모든 관련 코드를 업데이트해야 하는 불편함이 있다.
해결 방안: ViewBinding과 DataBinding의 도입
이러한 문제를 해결하기 위해 ViewBinding과 DataBinding을 도입하는 것이 권장된다. ViewBinding과 DataBinding은 컴파일 타임에 ID 일치를 보장하고, 뷰 참조 시 런타임 탐색을 거치지 않아 성능을 개선할 수 있다. 다음 포스팅에서 findViewById의 한계를 보완하는 ViewBinding과 DataBinding의 사용 방법과 장점에 대해 자세히 다룰 예정이다.
5. ClassCastException 발생 문제
findViewById는 XML에 정의된 ID와 코드에서 사용하는 뷰 타입 간의 타입 불일치로 인해 ClassCastException이 발생할 수 있는 위험이 있다. findViewById는 View 타입을 반환하므로, 원하는 뷰 타입으로 캐스팅해야 합니다. 이 과정에서 잘못된 타입으로 캐스팅하면 런타임에 오류가 발생한다.
예제: ClassCastException 발생
다음 예제는 TextView를 Button으로 잘못 캐스팅하여 ClassCastException을 발생시키는 코드이다.
class MainActivity : AppCompatActivity() {

    @SuppressLint("WrongViewCast")
    override fun onCreate(savedInstanceState: Bundle?) {
        super.onCreate(savedInstanceState)
        setContentView(R.layout.activity_main)

        // TextView를 Button으로 잘못 캐스팅
        val textView = findViewById<Button>(R.id.textView)
        textView.text = "this will cause ClassCastException!"
    }
}
위 코드에서 R.id.textView는 XML에서 TextView로 정의되어 있지만, 코드에서는 이를 Button으로 잘못 캐스팅하고 있다. Android Studio는 Lint 검사를 통해 @SuppressLint("WrongViewCast")를 제안하여 이 경고를 무시하도록 하지만, 이 경고를 무시하고 실행하면 앱은 빌드 단계는 통과하더라도 런타임에 ClassCastException이 발생하며, 다음과 같은 오류 메시지를 출력한다.
java.lang.ClassCastException: android.widget.TextView cannot be cast to android.widget.Button
참고로 @SuppressLint("WrongViewCast") 를 작성하지 않을 경우 빨간 줄이 뜨긴 하지만 빌드는 되고 이후 ClassCastException이 발생한다.

이 문제는 ViewBinding을 사용하면 해결할 수 있다. ViewBinding은 컴파일 타임에 올바른 타입의 참조를 생성하여, 잘못된 타입 캐스팅 오류를 방지한다.
마무리 및 다음 주제 예고
안드로이드에서 findViewById를 사용하는 방법과 그로 인해 발생할 수 있는 다양한 문제점, 특히 XML ID 불일치로 인한 컴파일 오류 및 NullPointerException의 가능성까지 살펴보았다. Kotlin에서는 세이프 콜 연산자(?.)나 명시적 Null 체크를 통해 이러한 문제를 예방할 수 있지만, findViewById 방식 자체가 코드 유지보수성을 떨어뜨리고, 런타임에 뷰 트리를 탐색하는 구조 때문에 복잡한 레이아웃에서는 성능 저하를 일으킬 수 있다는 단점이 있다.
이 문제들을 보완하기 위해 안드로이드에서는 ViewBinding과 DataBinding이라는 강력한 바인딩 기능을 제공하여 코드의 안정성을 높이고 XML ID 불일치 문제를 방지하며, 런타임 탐색 과정을 줄여 성능을 향상시킨다. 다음 글에서는 findViewById의 한계를 극복하는 ViewBinding과 DataBinding의 도입과 장점을 자세히 다뤄보겠다.
다음으로 읽으면 좋은 글 추천
https://yujinius45.tistory.com/126
[Android] ViewBinding 동작 원리 파헤치기
안드로이드 ViewBinding 동작 원리 파헤치기이전 포스팅에서는 findViewById의 내부 동작 원리를 살펴보았다.https://yujinius45.tistory.com/125 [Android] findViewById 동작 원리 파해치기안드로이드 findViewById 동작
yujinius45.tistory.com
https://yujinius45.tistory.com/127
[Android] 안드로이드 ViewBinding 완벽 가이드: 개념, 도입 배경, 사용법, 동작 방식 및 컴파일 위치
안드로이드 ViewBinding 완벽 가이드: 개념, 도입 배경, 사용법, 동작 방식 및 컴파일 위치안드로이드 개발에서 findViewById 메서드는 XML 레이아웃에 정의된 뷰를 코드에서 참조하기 위해 오랫동안 사
yujinius45.tistory.com
'Android' 카테고리의 다른 글
| [Android] Unresolved reference: BR.isTextLongEnough 에러 해결 (1) | 2024.11.16 |
|---|---|
| [Android] DataBinding 동작 원리 파헤치기 (0) | 2024.11.10 |
| [Android] 안드로이드 ViewBinding 완벽 가이드: 개념, 도입 배경, 사용법, 동작 방식 및 컴파일 위치 (9) | 2024.11.09 |
| [Android] ViewBinding 동작 원리 파헤치기 (4) | 2024.11.09 |
| [Android] findViewById 동작 원리 파헤치기 (1) | 2024.11.09 |